
I was introduced to Linux containers around early 2018, and I have divided my coding calendar into two parts: Before Container Era (B.C.E) and Container Era (C.E.) Even though I consider that I am still on the steep side of the learning curve, knowing how containers work and using them to code and deploy full-stack applications has exposed me to a new coding world that would probably have taken me many more years to discover. That’s why I decided that my first post would be a practical guide to coding with containers. There are many container runtimes, but for this introduction, I will be using Docker.
Baremetal
Let’s say you just bought yourself a new Tatung Einstein and you are eager to unbox it. Your Einstein, being an "Electronic Computing Instrument" has a certain architecture that allows you to play your favorite like games Starquake and Chuckie Egg. It is also loaded with all the essential components like processor and memory that will allow you to run any application on the computer. These are the finite resources you have to run applications. Every time you click play on a YouTube video, open an application, click save on a file - you are creating that need to be handled by those system resources. Something has to make sure that your resources are not getting overwhelmed will all the tasks being requested by each application. Something needs to manage the requests and balance them with what your computer can handle.
The Kernel does exactly that! It speaks the language of your system resources, while the application speaks the Kernel’s language (i.e. system calls). In effect, the application has access to system resources through the kernel. The kernel then schedules each of the requests from each application with the system resources an makes sure the response gets back to the application. It does this in an asynchronous way, which is why you can browse the internet after starting a song on Spotify.
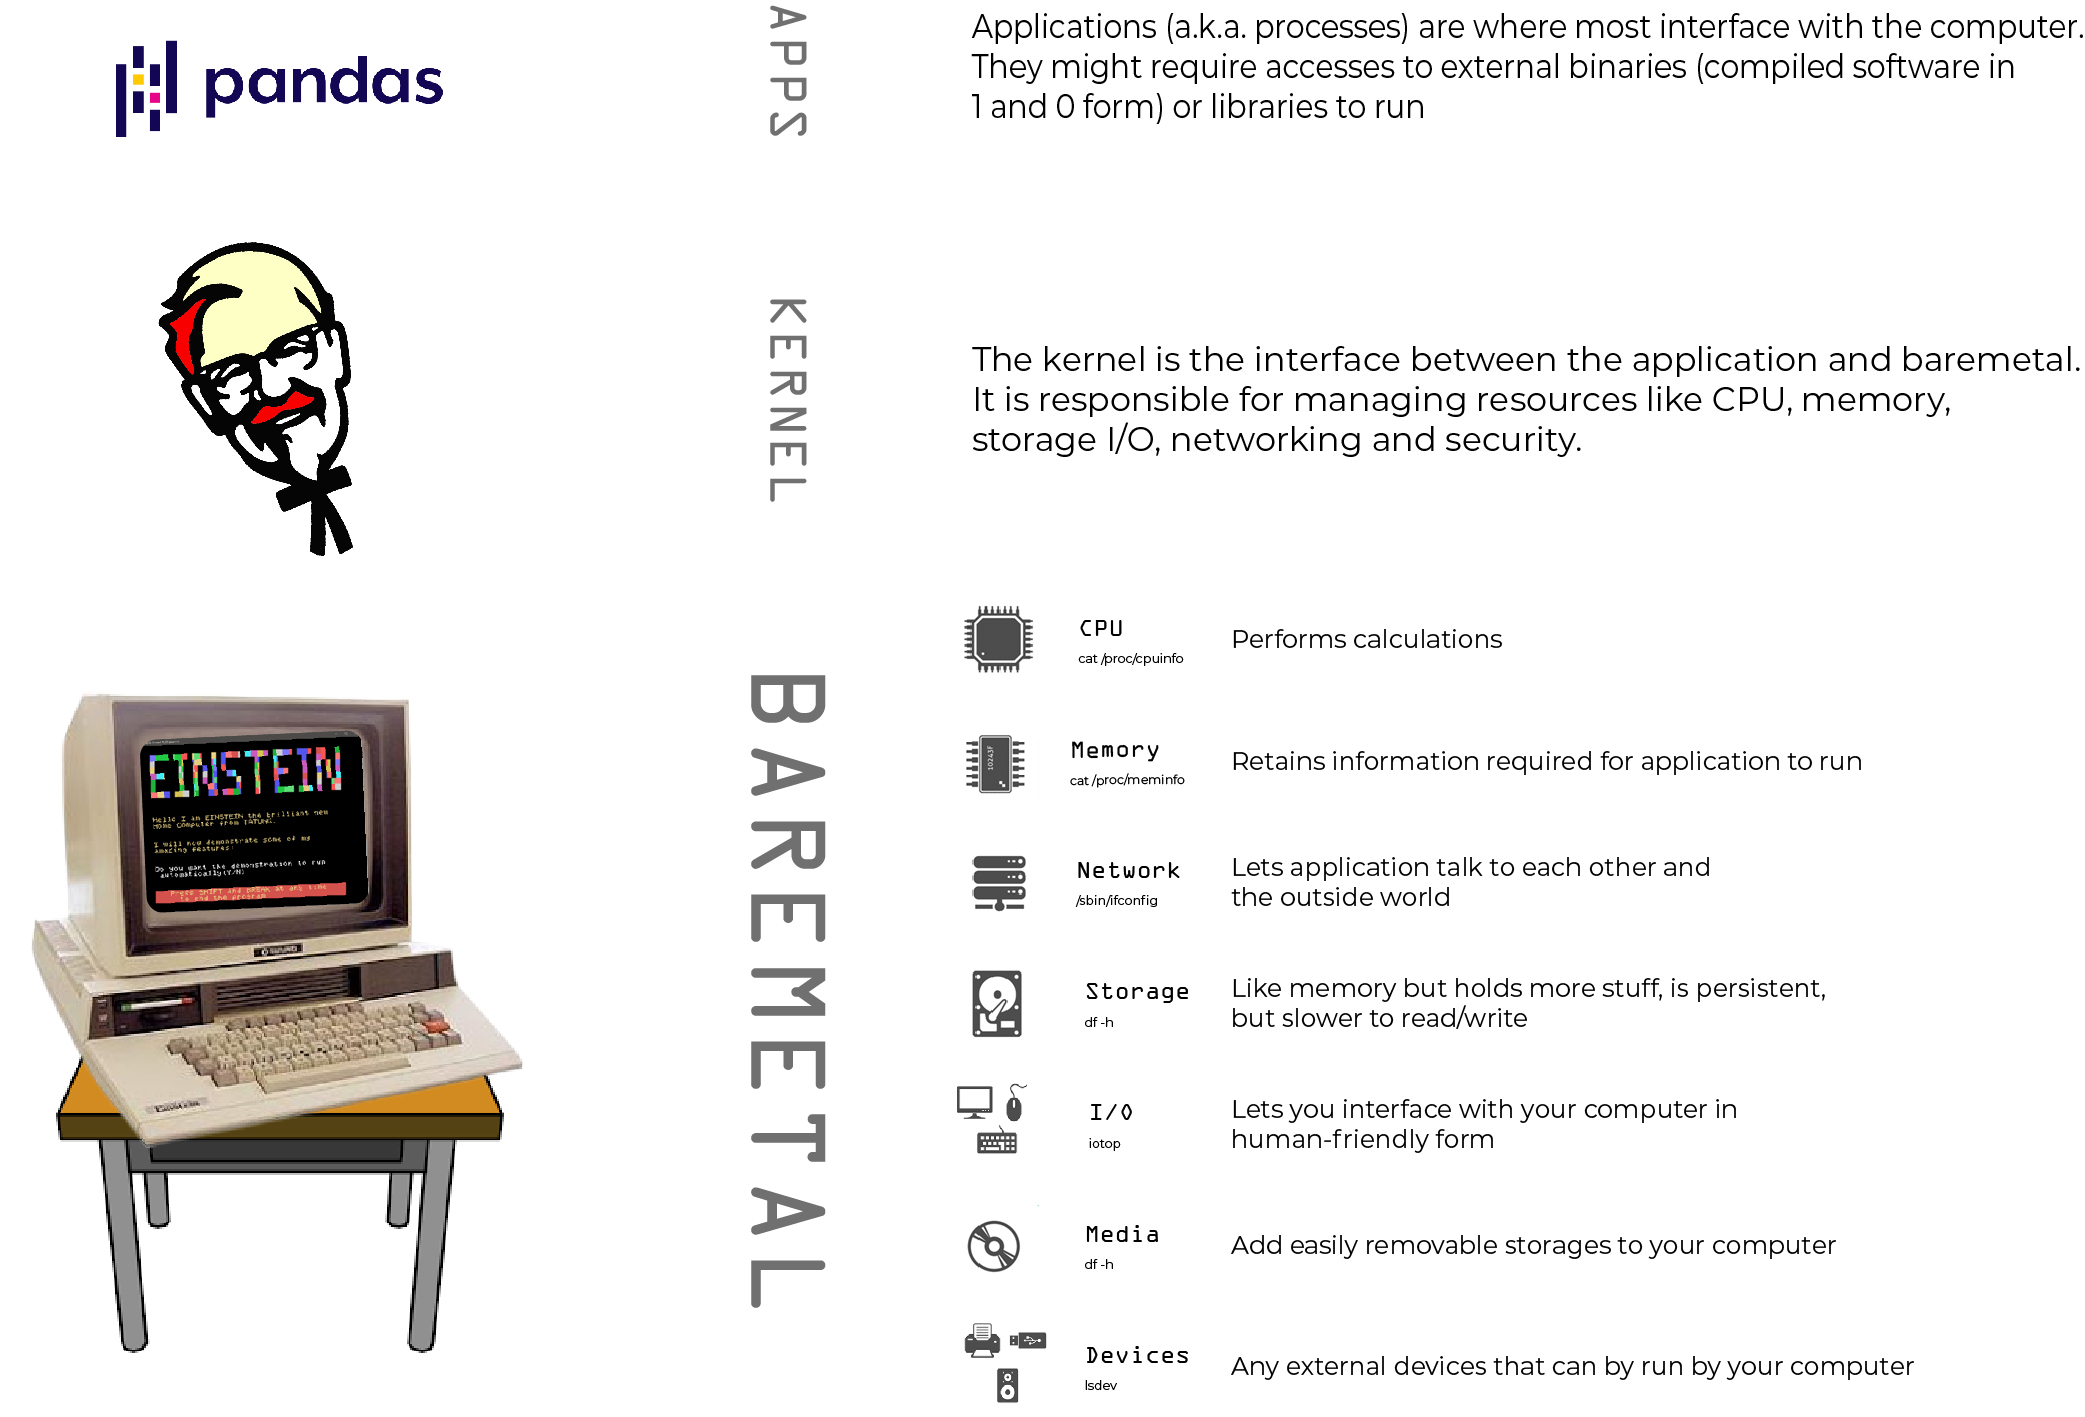
“Application” is the name we give to icons running on our system trays or menu bars. In general, these are known as “processes” to the operating system. There are processes that are familiar to us like the Chrome browser or Microsoft Word, but there are many other processes we never interact with directly that are running the background. These processes all need to use system resources and interact with the kernel to get access to them. Luckily, the complexities of how the kernel manages processes and how processes interact with the kernel are not necessary to know to work with containers. Like everything with computers, there are levels of abstraction built upon these intricacies so that we mere-mortals can interact with them in a more human way .
Enter the container technologies
The comparison that is always made with containers is with a virtual machine (VM). Essentially, containers are processes that exist entirely within the kernel and don’t have a kernel of their own as in the case of the VM. The picture you might have seen of containers on top of an OS or container manager is a bit misleading since the technology that enables containers is part of the kernel itself. The containers should actually be inside of the kernel (i.e. OS), but that makes for a more complicated picture.
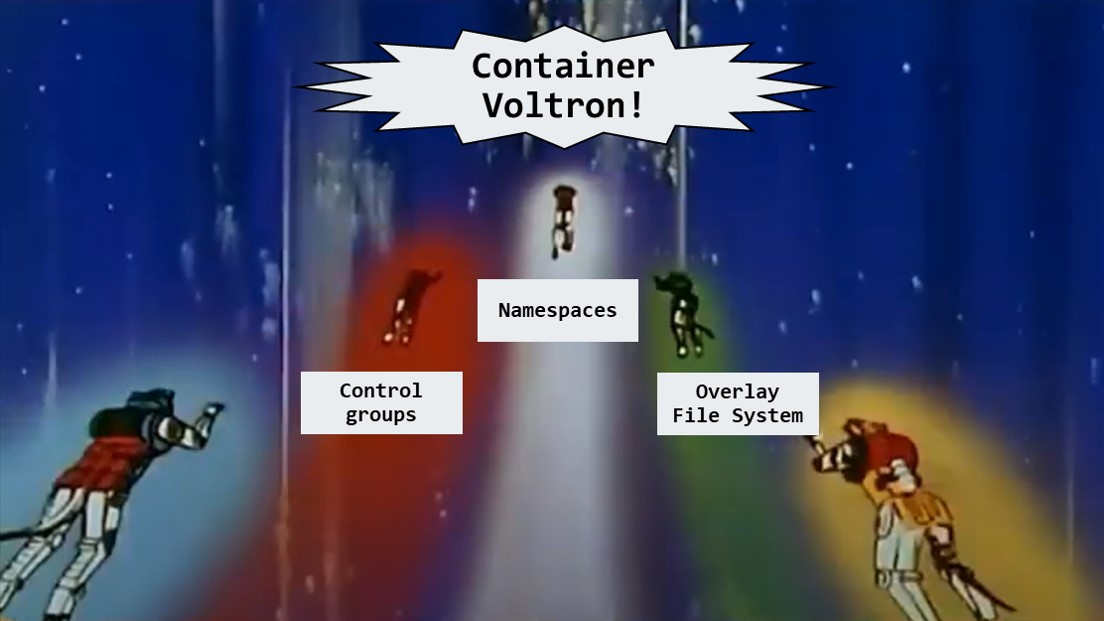
I have been using the word “container,” but I should have been using the qualifier “Linux container” when referring to them. Containerization started off in the Unix operating system with the command chroot in 1979 which set the root directory for a particular process. This basically isolated processes to their own file system. This later gave way to the technologies that, when combined, form containers:
Namespaces allow the isolation of resources - The resources are partitioned in the Linux kernel so that only processes within that namespace can access that resource. This is how containers can communicate a common network and have read-write access to a common file system.
- Namespaces allow the isolation of resources - The resources are partitioned in the Linux kernel so that only processes within that namespace can access that resource. This is how containers can communicate a common network and have read-write access to a common file system.
- Control Groups allows you to limit resources to processes - You can set memory limits or number of CPU cores to processes. You can also control processes or groups of processes. This allows you to start, stop and pause containers.
- Overlay File System - Creates a file system made of up of layers which can be used for images of different containers. This avoids duplication of common layers and allows containers to not get large in size that would require more disk space and slow deployment. No one wants that!
Where does Docker fit in?
When I first started with containers, I started with Docker. I thought containers=Docker. I later found out that what Docker did that made it synonymous with containers, is that they created an entire ecosystem for developers to easily work with and develop for containers. You didn’t have to use Linux container primitives like nsenter to create namespaces or cgcreate to create a control group. This could all be handled with the docker container run command. Docker also created an easy way to create and manage container images, with everything from an image format to an external repository from which you can push and pull images. Since then, container standardization through efforts like the Open Container Initiative (OCI), the technologies you can use to develop containers has blossomed. There are many container runtimes at low and high levels, although Docker remains a popular method as a turn-key solution. I will stick to “practical containers” for this post, but if you like to go down the rabbit hole with many tab browsers open, like me, feel free to read this insightful blog post on container runtimes. He describes it much better than I can.
When you install Docker on your local machine, you are installing a client-server application that allows you to manage containers and images. Additionally, you can install docker-compose which will turn your containers into scalable services. We will go over these in more detail in the next section. For now, go take a break to ruminate.
Containers
Container anatomy
Now that you have unboxed your new Einstein and have installed the latest version of Ubuntu on it (let’s suspend reality for a bit), you then want to see which processes are using which ports are being used so you run a netstat -tulpn. You get the response, “Command ‘netstat’ not found, …”, so you apt install net-tools and you continue. Installing netstat added the necessary files to your Ubuntu file system to run the application. Since everything in Linux is a file , anything that you do: run a command, create new user, copy a file into a folder etc., changes your filesystem. These changes are made in Linux’s user space which is kept separate from the files that make up the kernel, normally found in the /boot dir.
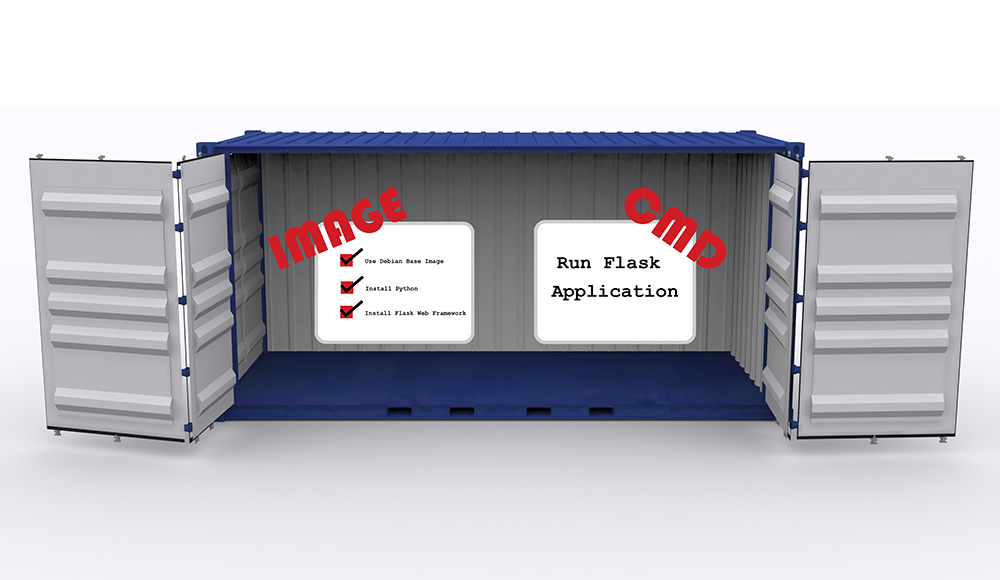
This user space file system is one essential part of the container. The kernel files are not necessary because, as mentioned before, the container uses the OS kernel to request resources from the hardware. The other essential part is the command that the container is going to run with these files. The file system and command come together to run that command with the process isolation provided by the container, and, once joined, they are inextricably linked for the life of that container. (You can change config.json of the container and restart the docker service, but that’s terribly manual and defeats the the purpose convenience) That means that if the file system has the binaries to run the awk and sed command, you can’t create a container with the awk command and then run the sed command inside the same container. You would have to create another container with the same file system to run the sed command. You would even have to create two containers if you wanted to run echo “hello world!” and echo “hola mundo!”. You are able to run that container as many times as you want, but it has to run that same command - every time! The user space file system is called the container image, and is one of my favorites things about containers. Let me tell you why.
Images
If you’ve ever gone through the trouble of setting up an environment for application development based on some loose instructions another developer gave you, you’ve probably experienced a spike in cortisol levels. Having a script that installs the necessary libraries for development would be helpful, but the script might not work because your machine might not be configured the same as the other developer’s. Only if you had the same starting point (i.e. file system), and precisely followed the same steps to install the libraries, could you ensure that both of your development environments are the same. This is exactly what a container image does.
Container images are recipes with the steps needed to cook your tasty application. The index card on which you write the recipe, is the Dockerfile. External repositories like DockerHub where these recipes can be retrieved and stored are like epicurious.com. There is a wealth of information inside each Dockerfile, particularly the official versions of applications. I learned a lot by pouring through Dockerfiles, building the file and inspecting the resulting file system. Since the images are Linux file systems, it has taught me about how to use my own Linux OS. Sometimes, when I want to see what is the difference between different flavors of Linux OS, I create a CentOS and Debian containers and explore the file systems side by side until light bulbs go off.
Let me continue with the cooking metaphor for just a little while longer. I love me some mise en place when cooking. Getting everything ready to prepare for cooking, is like your Dockerfile build context. It contains all your source code, environment files and extra resources you might need to build your image. When you cook, there are instructions like “cut”, “saute”, “add” and “blend” that become part of your cooking lexicon and can be applied to any recipe. The same is true with Docker. There are many commands that can be used in the Dockerfile, but I will focus on the following three important ones:
- FROM - Establishes the base image. This can be a particular OS or a pre-built application that will form part of your overall application. You need a relational database? Pull the Postgres image. You need an application cache, pull the redis image. If the application you pull statifies all your needs (users, files, security) then you don’t need to customize by layering other commands on top of this image.
- ADD - Adds local files from your build context (i.e. the area that contains all the files necessary to build your image) to the container. There is another command called COPY that does the same thing, but ADD allows you to use URLs and compressed files in a known format (e.g. tar.gz) and automatically decompresses them in the destination you specify
- RUN - This allows you to run commands inside of the container. Let’s say you need the files to compile your C program, you can do RUN yum -y groupinstall ‘Development Tools’ Command can be concatenated together by using the && operator. All the commands that are concatenated are seen as one layer in the image.
Let’s use some of these commands to create a Python image with web application modules installed. The Dockerfile below, pulls the latest Python 3 release, creates and changes the working directory to the /app directory, copies the requirements.txt from the build context directory (in this case, the folder that contains the Dockerfile), and finally runs pip to install all the modules defined in the requirements.txt. Each command (i.e. the words in capital letters) changes some file(s), thereby creating a snapshot of the file system that turns into a layer in the Docker Image. Each layer is stamped with a hash that is a unique identifier of the contents of that layer. This is how the Docker Engine can identify layers with the same content and save space by reusing the same layer if it’s used in multiple images.
FROM python:3WORKDIR /appCOPY requirements.txt requirements.txtRUN pip install -r requirements.txt
Since the image layers are identified by their content, any content you change in one layer will change the content in every subsequent layer. Every layer after which you made the change will have to be rebuilt. Let's take a look at what happens when run docker build . on this Dockerfile. If you run this command in the terminal, you'll notice that some the steps will show "Running in \<container_id>", and, after the step is finished, it says "Removing intermediate container \<container_id>" For any Dockerfile command that requires running a container, Docker will create a temporary container using the output image from the previous and the command of the current step. The animation below shows the step by step process.
- FROM python:latest - this pulls the python latest python image from Docker Hub If you click on the latest python image in Docker Hub, you will see that it too contains a Dockerfile. The image you are pulling is the result building that python:latest Dockerfile.
- WORKDIR /app - this creates the /app directory and cd's into it. Since this step requires running commands, Docker creates a temporary container using the python:latest image and the mkdir /app && cd /app command. After these commands are done, it takes a snapshot of the image file system of the temporary container and removes the temporary container. The snapshot become the layer in the image.
- COPY requirements.txt requirements.txt - This copies the requirement.txt file into the current working directory of the previous layer which, in this case, is /app. This step does not require an intermediate container because it's copying files from host to container and not running command inside the container itself.
- RUN pip install -r requirements.txt - This installs the modules defined in the requirements.txt file. This step does need an intermediate container because its running the pip command.
- Finished - The image is then tagged with the name you specified in the build command (\<none> if no tag was specified), and the ID of the image produced from the previous step becomes the ID of the image.
Commands
Managing individual Docker containers is done with the eponymous docker container command. You can manage the entire lifecycle of a container with this command. I'll describe some of the possible docker container commands for creating, deleting and montioring your containers. Recalling from the Container Anatomy section, the container is a kernel process that contains an image and a command that gets it going. I'll describe the management commands in the context of what is happening with the kernel, image and container command. For these examples, I will reference a Flask application.
Create
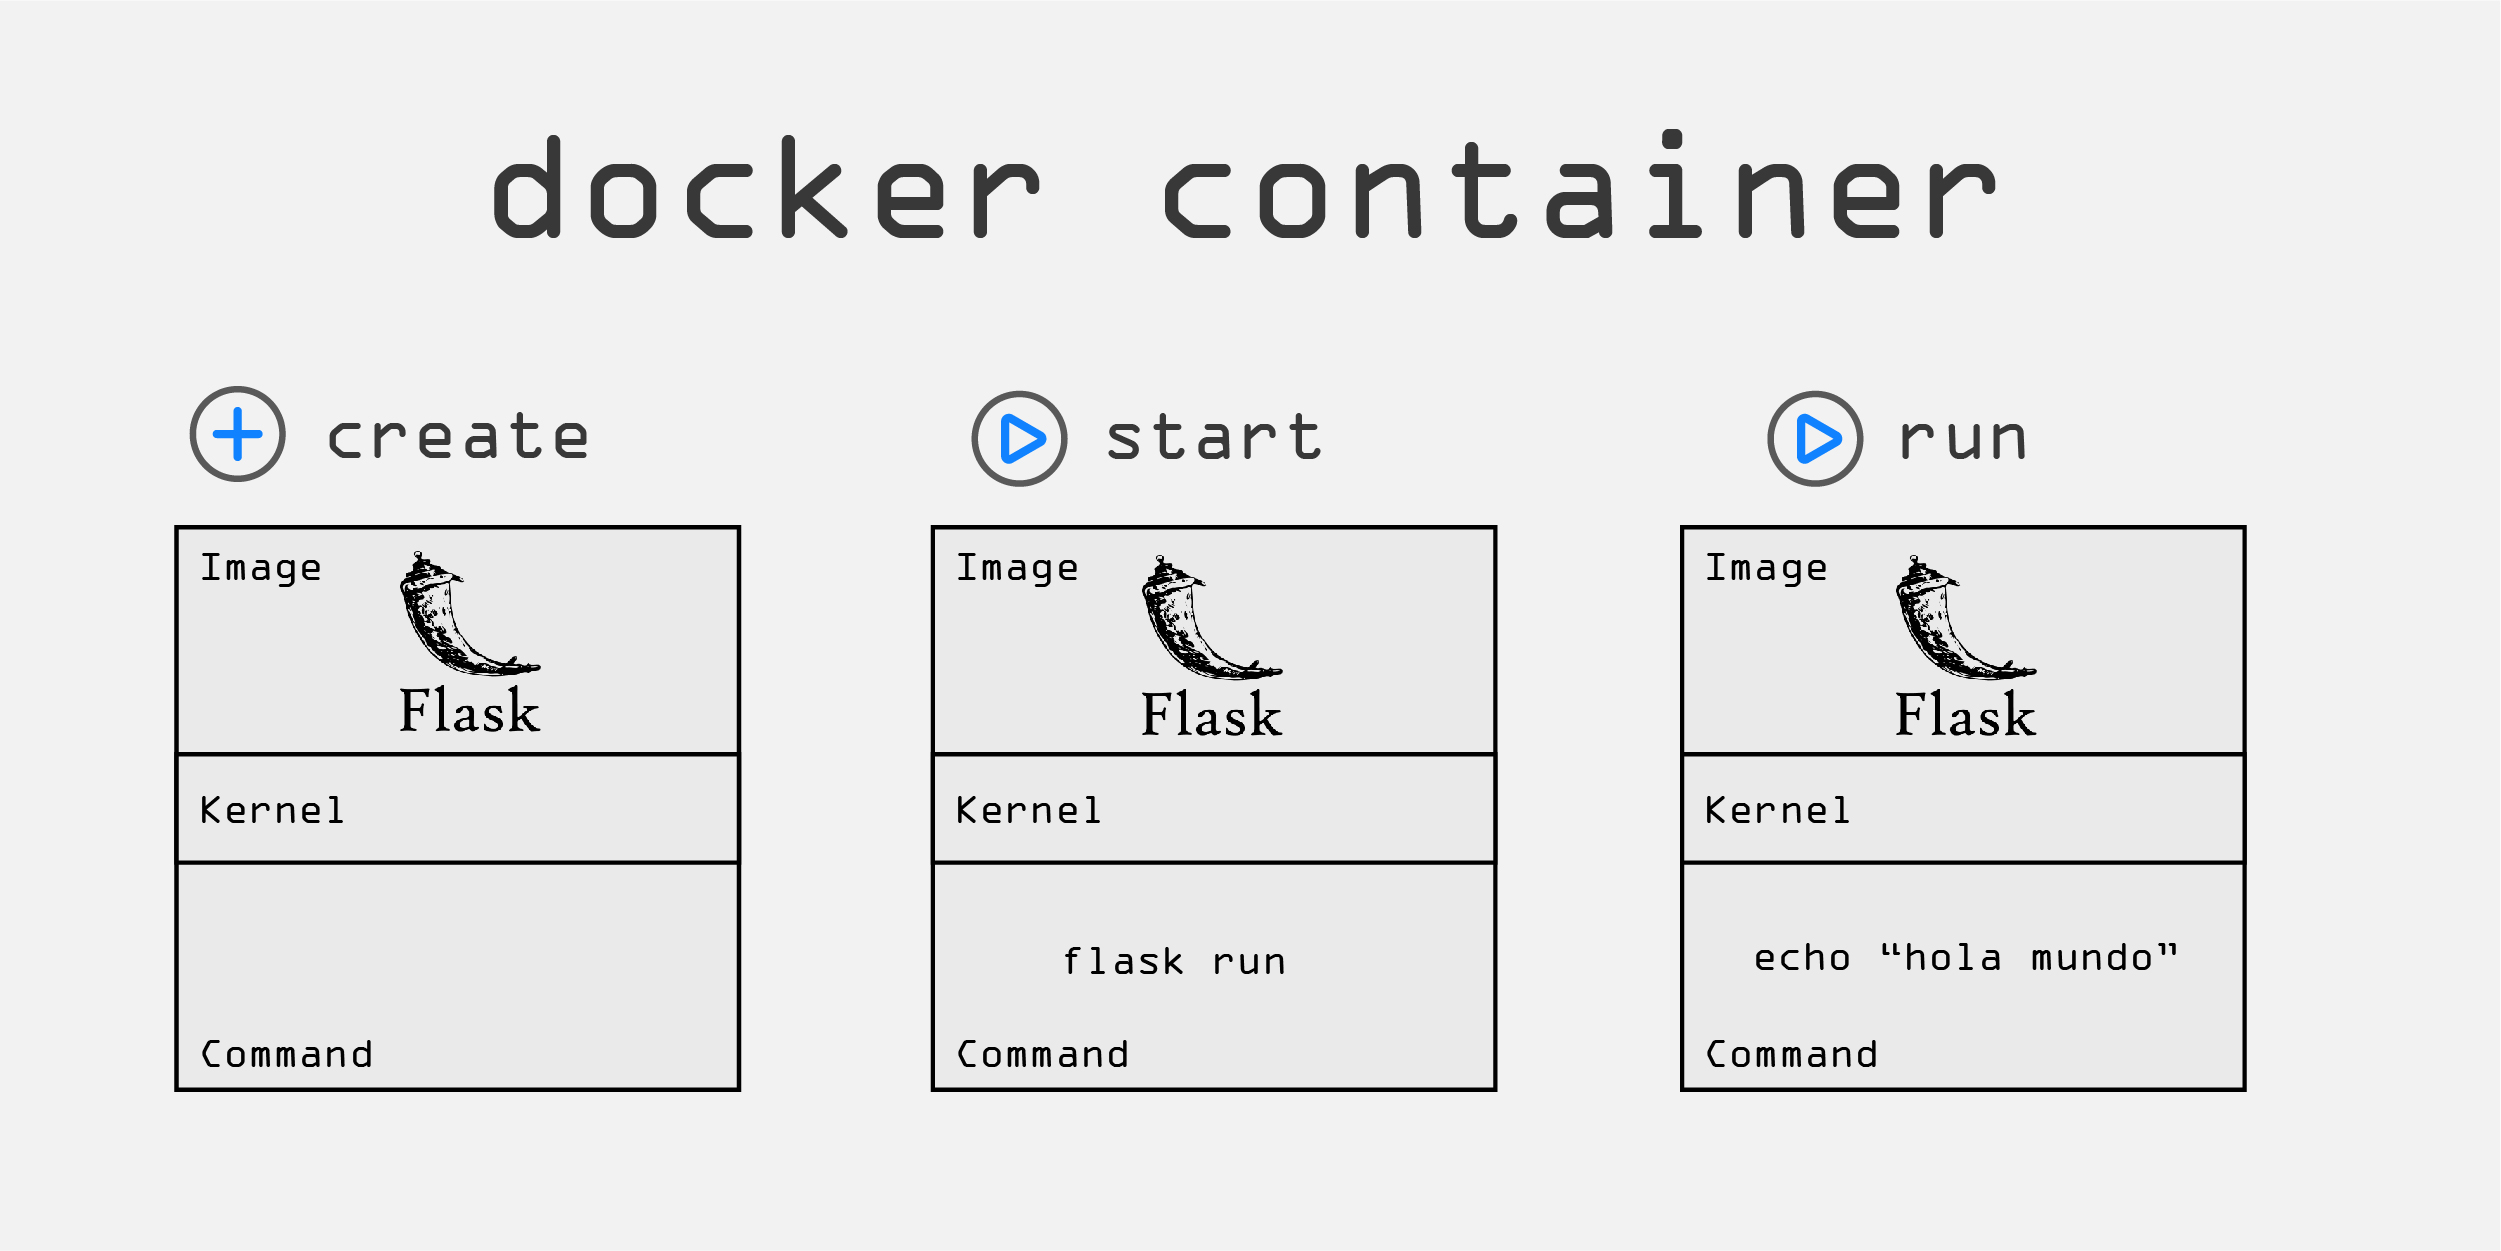
Creating and starting the container means getting the image ready and running the associated command which starts the process. The Flask image that was built in the previous section, is the image that will be used for the container. The docker container create command prepares the container to be run by using namespaces to create isolation around the Flask process and any other resources specified in the command (e.g. volumes, network) The docker container start command starts the process by executing the command that is associated with container that was set during the docker container create command. If you don't run the create command before running the start command, Docker will create the container for you and set the container command to the one specified in the image. The docker container run command is similiar to the start command, but it allows you to overwrite many of image and Docker runtime defaults. It does this by creating a writeable container layer that stacks on top of the image layers which are read-only. One of the main things that you can override is the container command. You can see from the image below, that instead of running the Flask application, you can use the container to execute a simple echo "hola mundo". The container will echo the string and the container will exit because the process in finished unlike the flask run command which keeps the app server running.
Delete
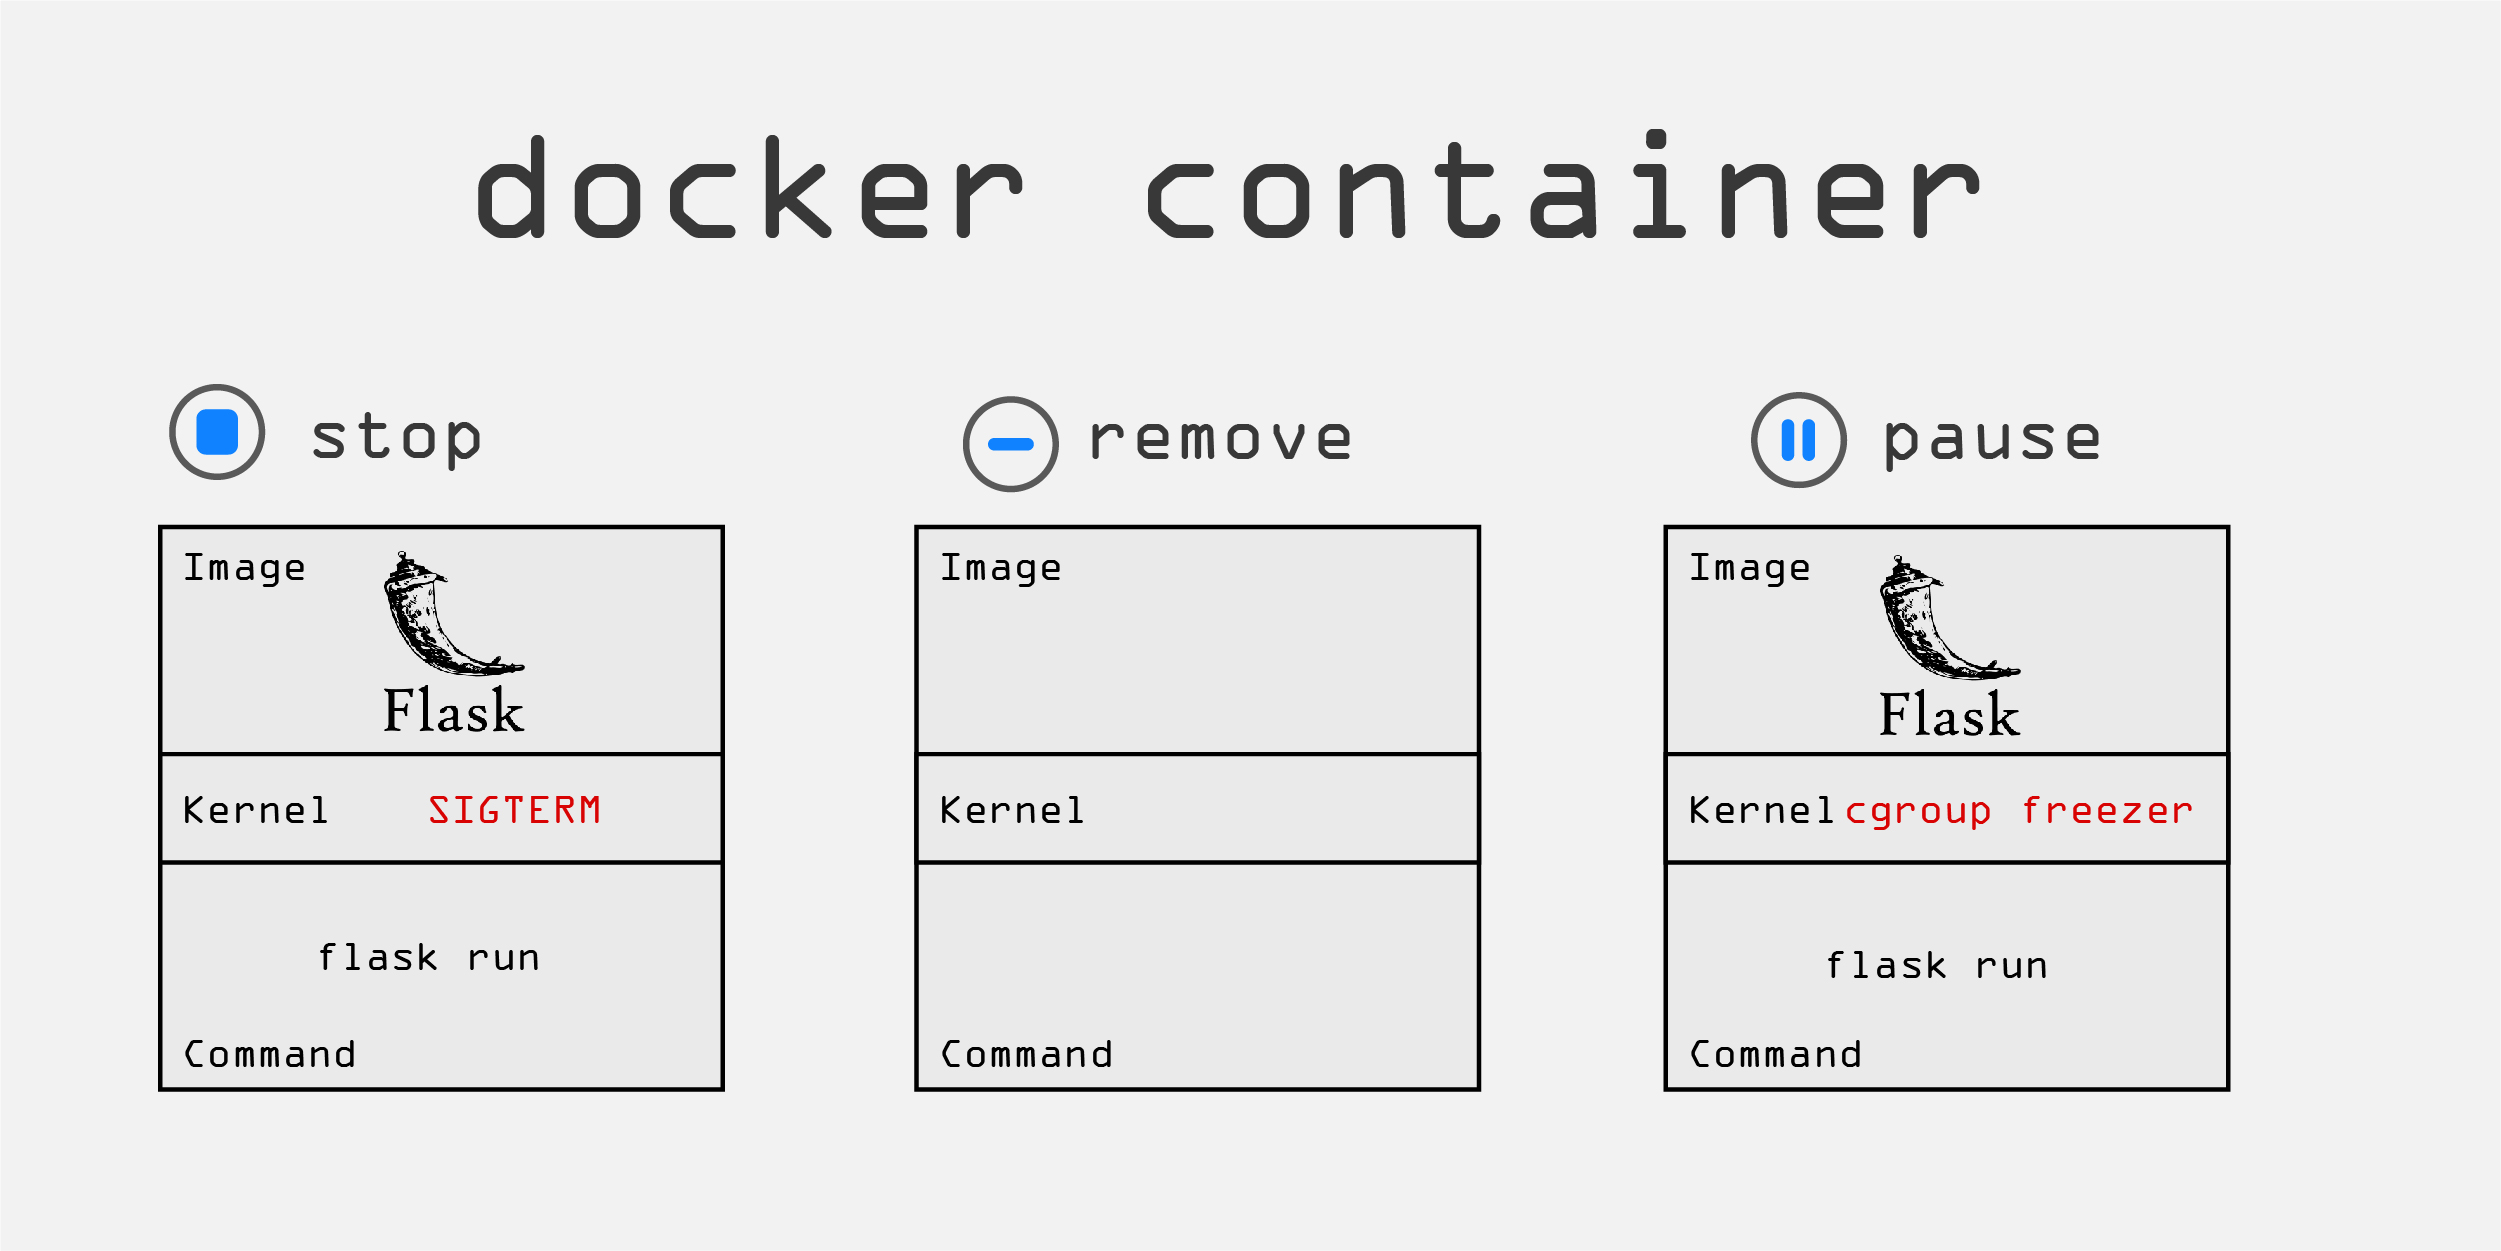
Stopping and removing the container is done by terminating the container process. Since it is like any other kernel process, the terminate signal, SIGTERM is sent by the kernel to the process. If the process doesn't shutdown within a certain time period for whatever reason, the kill signal, SIGKILL, is sent. The docker container kill command sends the SIGKILL signal to the process directly.
The normal way to pause and continue a process in Linux is with the kill -STOP and kill -CONT commands. Since a docker container is a collection of different processes,the docker container pause command used the cgroup freezer which can manage a collection of tasks that use system resources.
Monitor
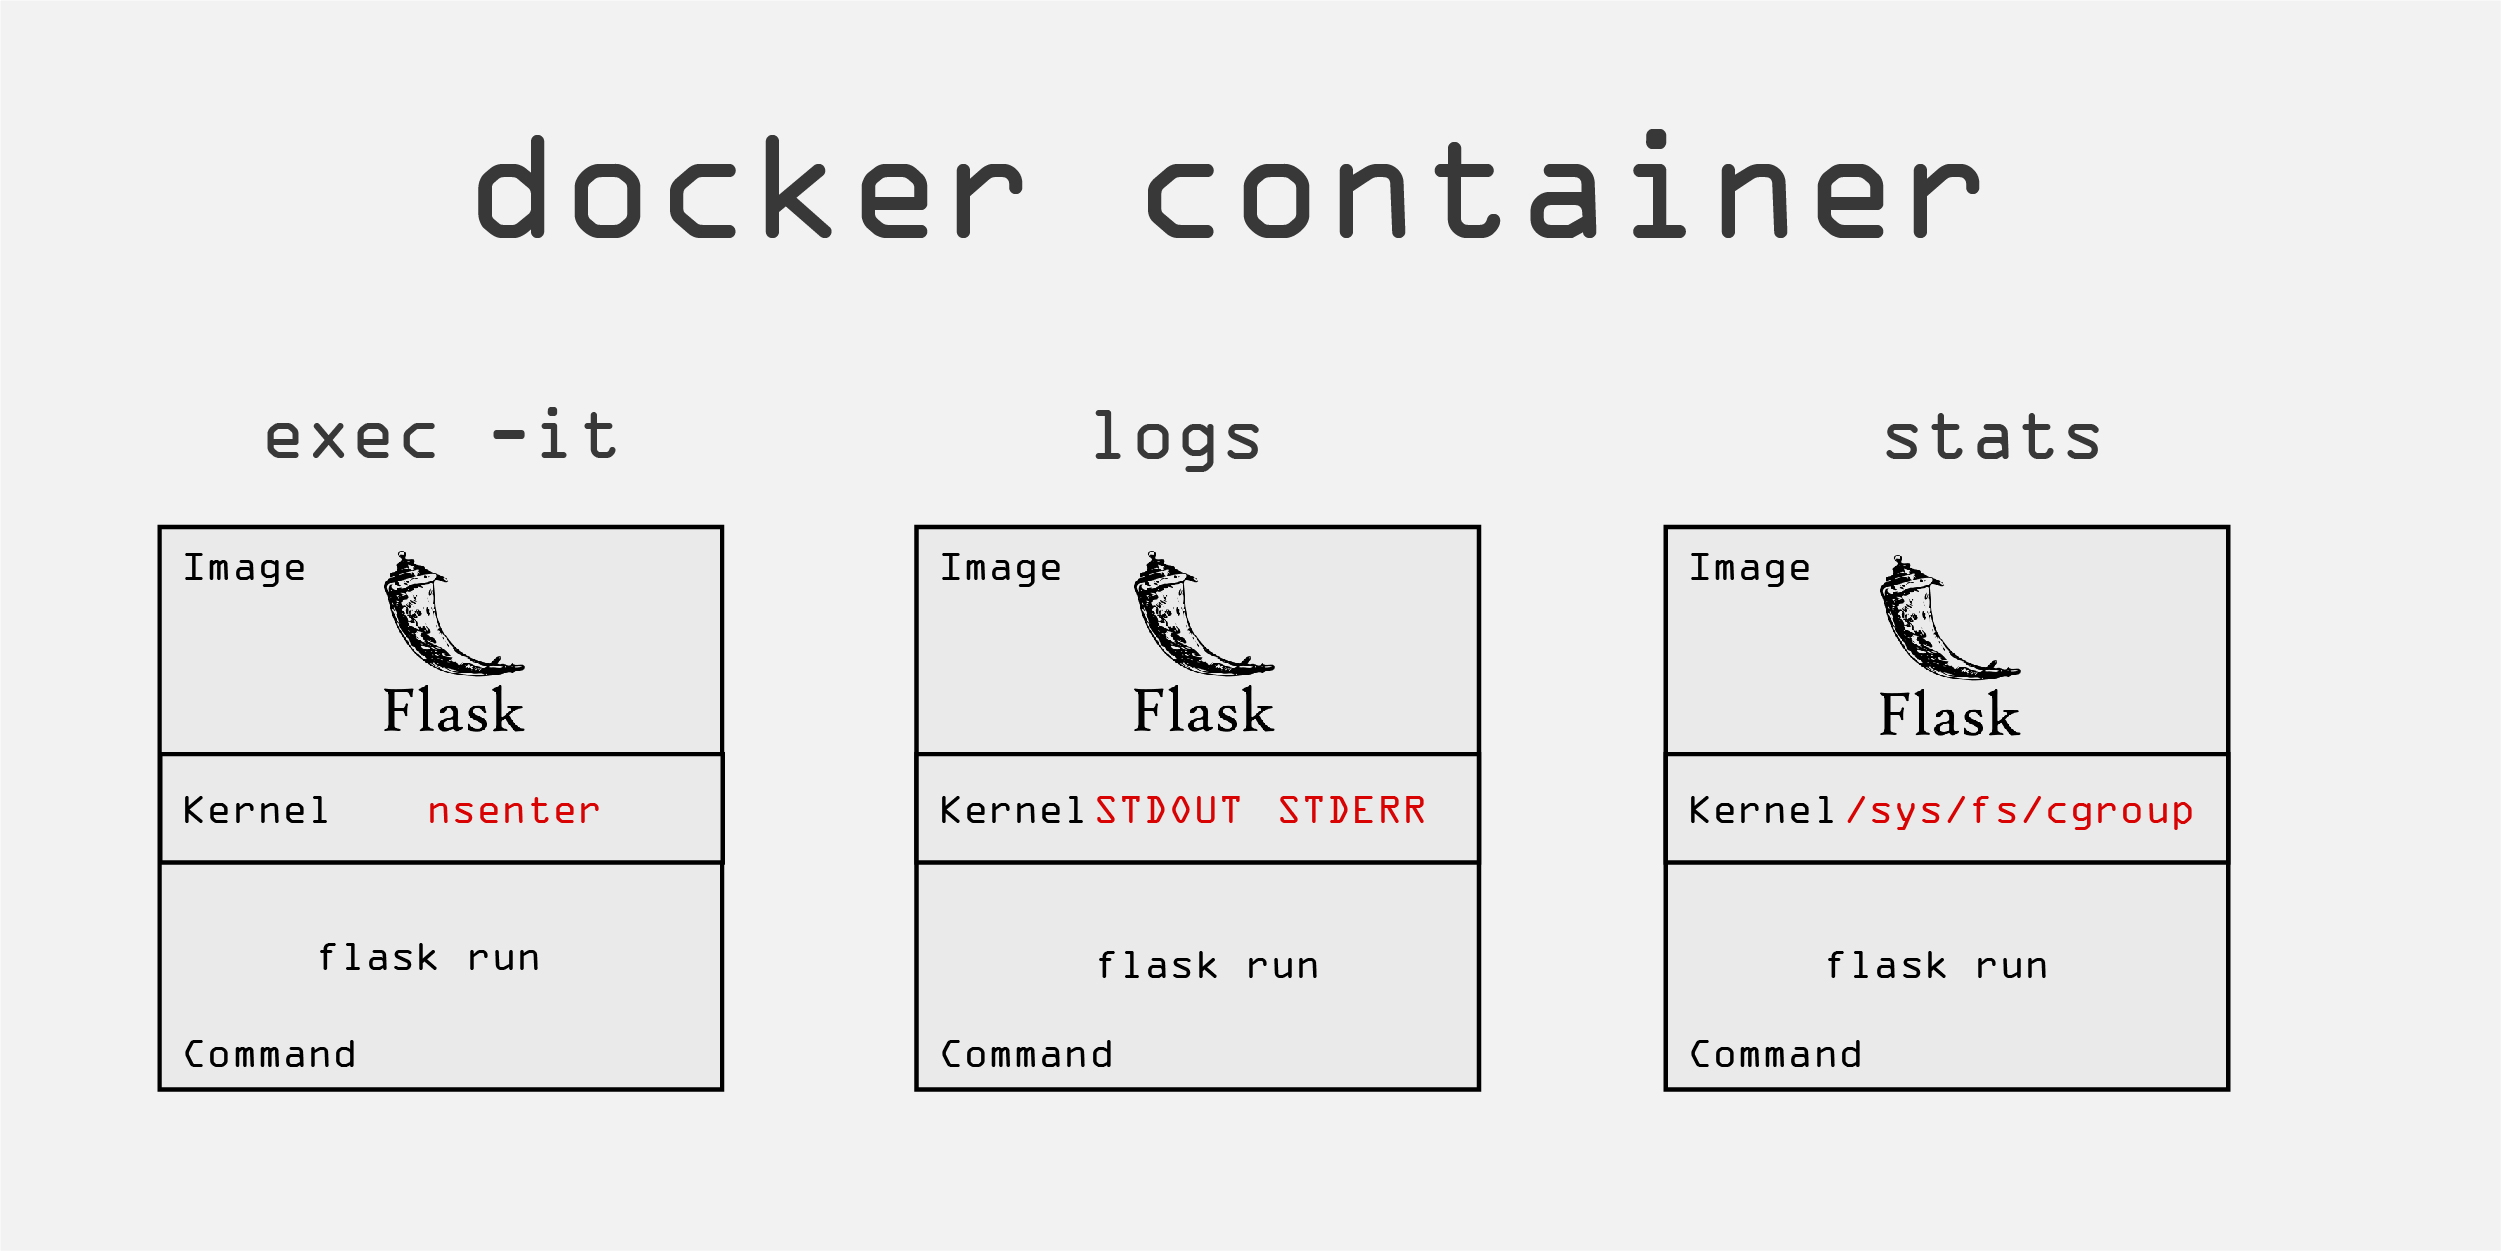
Working with docker containers would be infinitely painful if we couldn't monitor them for the process status or resource usage. The ability to get into the terminal of container was one of the first things I learned and has been the most useful. The is done with the docker container exec command. This gives you the ability to execute a command inside a running container. If you need shell interactivity then you'll need to pass the -i, for interactive, and the -t, for TTY, to use text because we are humans. The command docker container exec -it container_name bash is so ingrained into my motor cortex that my autopilot types it without thinking about the command. Once in the shell, you can do anything you need as long as you have the necessary packages installed in the container.
I have recently learned the word "observability" when talking about logging. I like the word much better since it's represent so much more than the text that is spit out of your application logs. In a past job, one of my roles was as an SRE (even though it wasn't called that). There were many applications logs but there was little observability in the system. I had to pour through copious amounts of text and sometimes correlate with logs from other services. Additionally, the system resources logs were in a separate system which made correlating what the application was doing with the system load at the time was and ad-hoc and manual process.
I am mentioning this because you might be developing a multi-service application with several containers that will provide observability into your system. The command docker container logs can show you the STDOUT and STDERR that you would see in the terminal, but you can also redirect your logs to your preferred storage option through a logging driver. If you are starting off or don't require much persistent system observability over long periods of time, then docker-compose will probably be a better fit.
The way that Docker automagically manages the system resources for a set of containers is truly astounding to me! As one process starts to ramp up in resource use, it throttles down the use of other containers. You can see the resource use of containers with the docker container stats command. This will continously stream usage of things like the memory, CPU, network, and I/O. Docker reports the container stats through a set of psuedo-files in the /sys/fs/cgroup for each metric. You can go to this directory and view the files but it's easier to use the stats command. Docker also has an API that live streams the metric stats JSON format.
Volumes
Sharing files among containers or between your host and container(s) as well as communicating with your container processes from your host device are essential for developing with containers. This is where volume and port mapping comes in. Once your container image is created, the layers that form your image are read-only, meaning that any source code that is copied into the container at build time will remain the same unless you rebuild the image. Imaging having to the rebuild the image every time you wanted to see your source code changes?! That would be beyond cumbersome!
Volume mapping saves the day by allowing you to share files between host machine and containers. That way, any change that is made to files on your host machine will automatically be reflected inside the container. You can either specify a particular location for the volume on your file system, or let Docker manage that in /var/lib/docker/volumes. This is the difference between a bind mount volume and a named volume, respectively. You can navigate to the directory where the volume is stored on your host system and see the same files in the destination directory in your container. There are two volume flags for volumes, but I will focus on the --volume or -v command since it's less verbose and easier to understand. The --volume flag takes three argument separated by a colon - \</dir/path/on/host/>:\</dir/path/in/container/>:\<comma-separated list of options>. The last argument is usually used to specify the volume as read-only mode. I would recommend using the --mount command if you have many options to specify. This is an example with a read-only option:
docker run -v /home/myuser/python-web-app/src:/app:ro python tail -f /dev/null
This command will start a container with the Python image and tail -f /dev/null command which effectively keeps the container running. The contents of /home/myuser/python-web-app/src will be mirrored inside the container in the /app directory which will be read-only.
Named volumes are useful when you have to share data between volumes and you don't necessary need to access the files on your host frequently or at all . For example, static files from a web application and a proxy application like Nginx or Apache can be shared via a named volume. As long as both containers have access to the same files, you don't care where they are stored on your host machine. We will see an example of this later with multiple containers.
Another reason to use bind mounts and named volumes are when you need the data to persist even after a container has been stopped and removed. (e.g. a database) Another type of volume that is benficial when you don't care if the data remains after the container is removed and you need quick read/write, is a tmpfs mount. This sets up a container in memory instead of your file system and avoids having to write anything in the container writeable layer, thereby avoiding your containers from becoming bloated.
Ports
Docker ports are really a subset of the larger Docker Networking umbrella. When you create a container, the Docker daemon, behind the scenes, provisions network resources for your container using namespaces and docker run assigns that container to the network. This included assigning a subnet and gateway to the network and even acts like a DHCP server and assigns the IP address of the container on that network. I have learned a lot about networking, in general, by playing around with docker networking and using the docker network inspect \<network-name> and the docker container inspect \<container-name> commands
Docker network really deserves its own post, but I am going to focus explicitly on how you can communicate directly from your host machine to a container process through port mapping. Let's say that you are running a container with the nginx image You can see that the default CMD for image is nginx -g daemon off. (Aside: The daemon off part of the command runs Nginx in the foreground allowing docker to track the process. Without this command, Nginx would run in the background and Docker can't track the process and think the process died even though it's just running in the background. This cause the container to exit immediately.) You can also see in the Nginx Dockerfile that port 80, the default http port, is exposed. But, if you run docker container run nginx and try to access localhost in your web browser, you will get an "Unable to connect" error. This is because the Nginx container is exposing port 80 inside the container and there is no link to you host machine. If you instead find the container IP address by running docker container inspect \<nginx-container-name> and type http://\<nginx-container-ip-address>, you will reach the default Nginx home screen.
You can instead bypass all of this by mapping port 80 of the container to port 80 on your host machine. Run the command docker container run -p 80:80 nginx and go to http://localhost in your host's browser,and you'll get the same default Nginx home screen. You can now communicate with your application by directly interfacing with the a port on your host machine instead of by the container's IP address which might change every time you create a container. This makes development a lot easier!
Multiple Containers
Now for the fun part! (just kidding, they are all fun parts :) Usually, as part of an application, especially a full-stack application, you are going to run multiple services/processes/applications that have complementary roles. This is particulary true in an application with a microservices architecture where there are many self-contained services that usually contain their own interface, processing center and data store. Containers make architecting applications much easier. But how do you get from running one container to coordinating several at once? Enter docker-compose. Docker-compose is tool that allows you to run several containers at once, through a configuration file instead of the command line. Once I learned about docker-compose, I seldom went back to running individual docker container commands. It allows you or orchestrate several containers (aka. services) at once and define how they are going to share data and talk to each other. The docker-compose configuration file is written in YAML. YAML is like JSON, but with less curly braces and where indentation matters. There are two main YAML concepts to know for docker-compose files: the ":" is used for key-value pairs and the "-" is used for lists. Let's scrutinize a docker-compose file for an application that has several services in it. The files for this example can be found in my sandbox/web-dev-playground Github repo.
Dissecting a docker-compose file
Take a look at the following docker-compose file that contains services for a full stack application. The frontend is a create-react-app client that communicates with a Django server and a Postgres through an NGINX reverse proxy. There is also a pgAdmin service that allows for easy administration of the Postgres database. The top levels of the docker-compose file defines the services as well as the volumes and network on which the services will share data and communicate. The specific functionality of this application will be subject of another post. I'll just focus on the configuration and docker-compose. Take a good look at the configuration, and I'll meet you on the other side.
# Docker-compose file for full stack applicationversion: "3.7"services:client:image: node:12-stretch # Pulls image from Docker Hubcontainer_name: client # Names running container 'client'working_dir: /app # Sets working dirvolumes:- ./client:/app # Binds './client' dir to '/app' inside containerports:- 3001:3000 # Binds port 3000 inside container to host's 3001 portnetworks:- sandbox # Adds container to sandbox networkcommand: npm start # Sets the container commandstdin_open: true # Needed for interactivity with terminal so CRA doesn't close upon startingproxy:image: nginx # Pulls image from Docker Hubcontainer_name: proxy # Names the running containervolumes:- ./proxy/default.conf:/etc/nginx/conf.d/default.conf # Adds default.conf file to location in nginx- static_files:/var/www/static # Bind volume to share static files from Django to proxyports:- 80:80 # Binds container http port to host http portnetworks:- sandbox # Adds container to sandbox networkserver:build: ./server # Sets build context. Will build Dockerfile.image: server # Tags built image with 'server' tagcontainer_name: server # Names container serverdepends_on: # Starts after the db service has started- dbcommand: ./manage.py runserver 0.0.0.0:8000 # Runs the development serverentrypoint: /scripts/entrypoint.sh # Runs this script upon starting containerenvironment: # Sets the environmental variables in the container for connection with DB- POSTGRES_API_HOST=${POSTGRES_API_HOST:-db}- POSTGRES_API_NAME=${POSTGRES_API_NAME:-api}- POSTGRES_API_USER=${POSTGRES_API_USER:-lempira}- POSTGRES_API_PASSWORD=${POSTGRES_API_PASSWORD:-changeme1234}volumes:- ./server/src:/app # Binds volume in './server' to '/app' in container- ./server/scripts/entrypoint.sh:/scripts/entrypoint.sh # Adds entrypoint script to container- static_files:/app/static # Bind volume to share static files from Django to proxyports:- 8001:8000 # Binds port 8001 in container to port 8000 in hostnetworks:- sandbox # Adds container to sandbox networkdb:image: postgres:12 # Pulls image from Docker hubcontainer_name: db # Names running containerrestart: always # Will automatically restart container if it stop.environment: # Sets the environmental variables in the container- POSTGRES_PASSWORD=${POSTGRES_API_HOST:-changeme1234}- POSTGRES_API_HOST= ${POSTGRES_API_HOST:-db}- POSTGRES_API_NAME=${POSTGRES_API_NAME:-api}- POSTGRES_API_USER=${POSTGRES_API_USER:-lempira}- POSTGRES_API_PASSWORD=${POSTGRES_API_PASSWORD:-changeme1234}- SERVER_SECRET_KEY=${SERVER_SECRET_KEY:-changeme1234}volumes:- postgres_data:/var/lib/postgresql/data/ # Creates named volumes to store DB data.- ./db/scripts:/docker-entrypoint-initdb.d/ # Places init scripts in location where PG container will execute them on init.ports:- 5432:5432 # Binds PG DB port in container to same port in host.networks:- sandbox # Adds container sandbox networkdbadmin:image: dpage/pgadmin4 # Pulls image from Docker Hubcontainer_name: dbadmin # Sets container nameenvironment: # Sets environmental variables inside container- PGADMIN_DEFAULT_EMAIL=${PGADMIN_DEFAULT_EMAIL:-lempira@email.com}- PGADMIN_DEFAULT_PASSWORD=${PGADMIN_DEFAULT_PASSWORD:-changeme1234}ports:- 5050:80 # Binds port 80 in container to host port 5050. Port 80 already used by nginxnetworks:- sandbox # Adds container sandbox networkvolumes:postgres_data: # Create postgres volume to store DB datastatic_files: # Create static directory to share between Django and proxynetworks: # Creates the 'sandbox' network to link all containers.sandbox:name: sandbox
Each service has all the elements to build and run a container. Docker-compose gives you and easy way to manage them. Let first look building the container. You can either have docker-compose build and tag the image for you or simply pull the pre-built image from a container repository like Docker Hub. Take a look at client and server services. The client service only contains an "image" keyword and not a "build" keyword. This tell docker-compose to only pull the image from Docker Hub. In contrast, the server service has both the "image" and "build" keyword. This tells docker-compose to build the image located in the ./server directory and tag it with "server:latest" once it's built. There are many other build commands including building a specific Dockerfile and setting build arguments that you can define.
Allowing the services to talk to each other is essential for a multi-container application. This configuration creates a network called sandbox and each container is added to that network. The network sets up a DNS that allows you to access each container by the service name. For example, if you go into the interactive bash shell of the server container with the docker container exec -it server bash command and ping the proxy container by running ping server, you will get results. This is possible because both server and proxy are on the same network. In the same manner, when you define the Postgres host name in the POSTGRES_API_HOST environment variable for the DB connection in Django, you can simply put "db", the name of the Postgres service. Getting access to the services from your host machine is also useful for development. Notice how all of containers bind a port inside of the container to a port on the host machine. If the process communicates through http protocol, then you can interact with the process through your browser by going to http://localhost:<port-number>. This is useful for development but not something you would do in production for security reasons. That's the purpose of the nginx reverse proxy.
The ability to share files between containers is also an important part of a multi-container application. In this configuration, the Django application will have some static files that will be served by the Nginx proxy. Both containers have the static_files named volume, but the Django container stores those files in the /app/static directory inside the server container while the Nginx container stores them in /var/www/static. When Django runs the collectstatic method to add the files into /app/static, they are mirrored in /var/www/static. The Nginx default.conf has a location block for /static/ and gets the resources from the /var/www/static directory.
All of this could have been achieved by running individual docker container run commands to start up each container separately and have them join the same network and share the same volumes, but the configuration file, in my opinion, is and easier why to see and manage each container setup. The real power comes when you run docker-compose.
Docker-compose commands
Since all of the settings for each individual service is defined in the docker-compose.yml file, the most important docker-compose commands are how to start, stop and restart the containers. This is acheieved by the up, down and restart commands.
The docker-compose up command in the directory were the docker-compose.yml file is located will start all of the specified services and provision any of specified resources like networks and volumes. It will also build or pull any images specified in the configuration file and are not in your local image cache. The services will start all at once unless the depends_on attribute is specified in the docker-compose.yml. This dependency, however, is only checks if the container has started up and not the application. Any check about whether the application is started and ready to interact should be done with a helper script or the application itself. For example, the server service relies on the postgres database being ready to accept connections. You can see that there is depends_on db attribute in the server configuration, but this won't help check if the database is ready to accept connections. This is accomplished by the entrypoint.sh file. In this script, there is netcat command that scans the db host's port 5432 and sleeps until it's ready. After it's available, it continues with intialization. You can choose to start all the containers or specific ones by specifying the names of the services you want to start after the up command.
Once the services are up and running, you can interact with the indvidual containers by using docker container or docker-compose commands. For example, if you want to bash into a running container you can either do docker container exec -it \<name-of-container/> or docker-compose exec \<name-of-service\> Just as in starting the services, you must run the exec command in the same folder as the yml configuration file. Notice that you don't need the -it flags for the docker-compose command. If you need to restart a container, you can simply run docker-compose restart \<name-of-service(s)\>.
The docker-compose down command will stop all the services, remove the containers and as resources you've provisioned like networks. You can also stop individual services by running docker-compose stop \<name-of-service(s)\>
Final thoughts
I wanted to start with containerization because it lays the groundwork for future posts. Future topics and applications will probably be done using containers. The fact that you have something that acts like a virtual machine but it really a process on your host computer is mind-blowing to me. It's level of abstraction that makes various operating systems and applications accessible by running a single command. The container repositories like Docker Hub are recipe books filled with instructions that teach you how applications are built. Prior to containers, building an application, particularly ones requiring third-party software, was a configuration nightmare. With containers, environments are easily reproducible meaning that deployments in production are more seamless. It paves the way for that 12-factor app nirvana.
Working with containers removes many difficulties but does present additional challenges. One of the biggest ones, I think, it that development is bit more cumbersome. Instead working directly with the code base of an application on your machine, you must remote into the container and make sure the communication between your conatiner and host machine is set up in such a way that the container behaves as if it were operating on your host machine. This requires you to properly bind ports and share files so you can still use feature like hot-reloading of servers. Like everything, I think it's just a matter of getting used to. Some might complain that this new level of abstraction might dull your skills in this or that area, but it's just a new perspective and doesn't stop you from going down into whatever rabbit hole you desire.